Landing Page Enhancements
What's Changing?
Enhancements to Landing Pages are expected to rollout during Summer of 2024. Landing pages will continue to be built using bands. Back-end code improvements will allow more flexibility and control of bands and the content contained within them. This improved function, combined with a friendlier user interface and a new look in editing mode, improves the content management workflow. The site visitor experience will remain unchanged.
When these enhancements are enabled, content creators can:
- drag-and-drop content from one column or band to another.
- easily add columns to (or remove them from) an existing band.
- quickly add new bands.
- easily rearrange bands on the page.
- duplicate bands and the content within them.
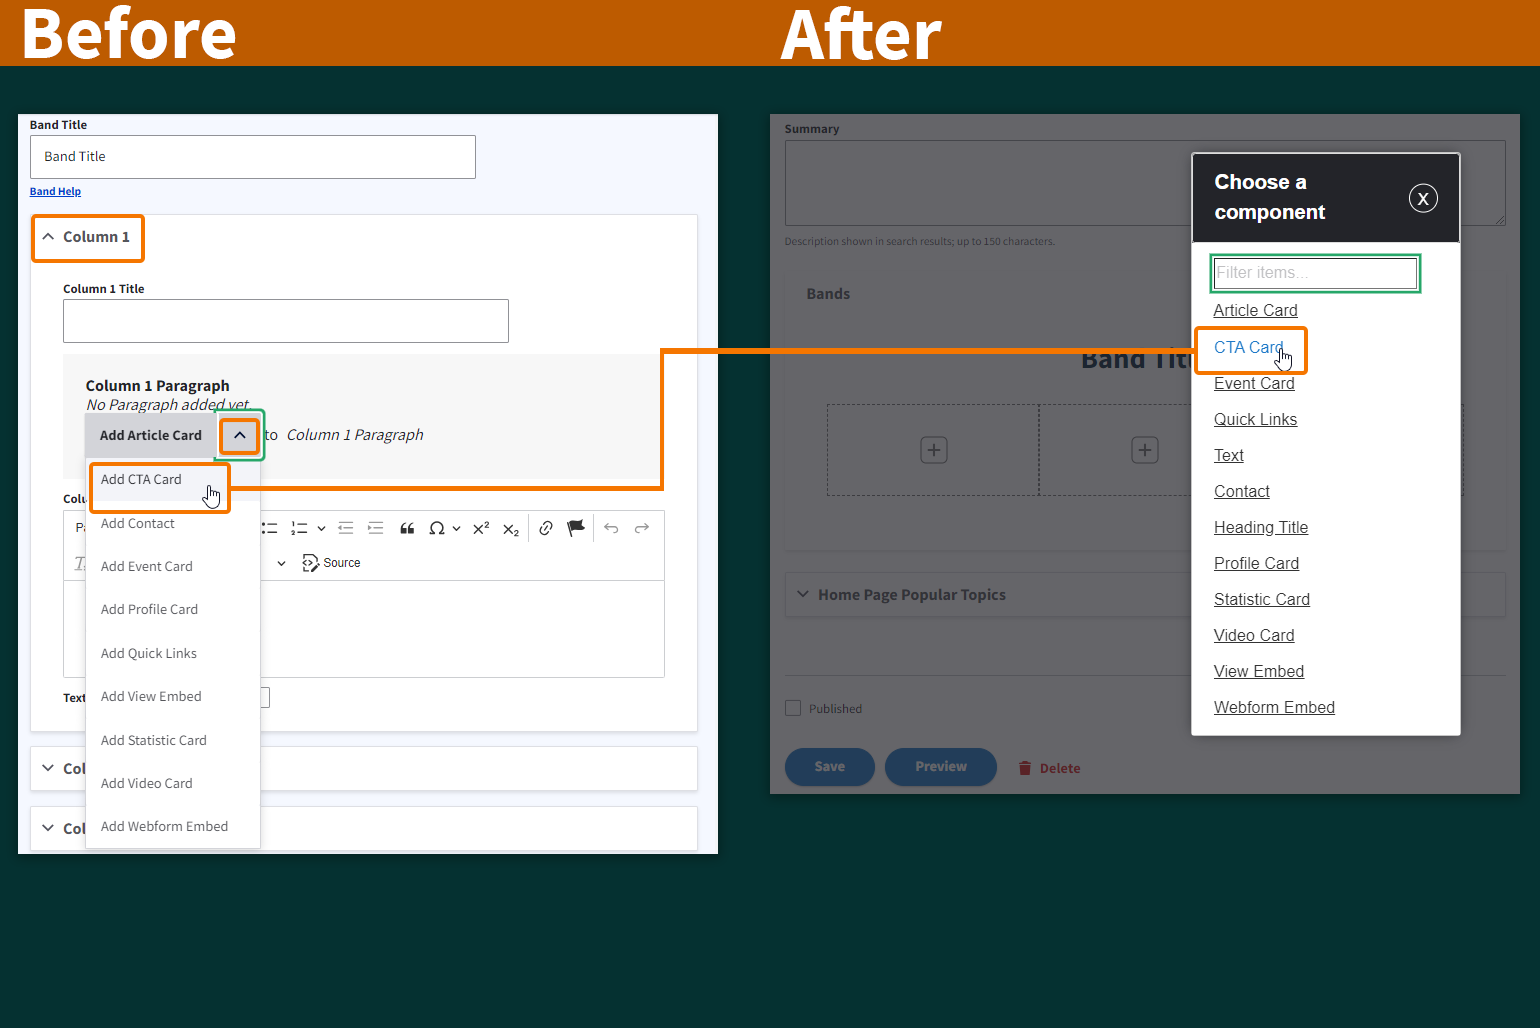
Navigating the New User Interface on Landing Pages
The new user interface is designed to feel more intuitive and easier to navigate, but even positive changes involve an adjustment period. We have developed some materials to guide you as you adjust to the improvements:
- An overview Video Demonstration highlights new features.
- New toolbars and their icon meanings are listed in a table below.
- Before-and-After screenshots and steps are provided for comparison.
Layout Paragraphs: Landing Page Enhancements in Action
Icons and their Meanings
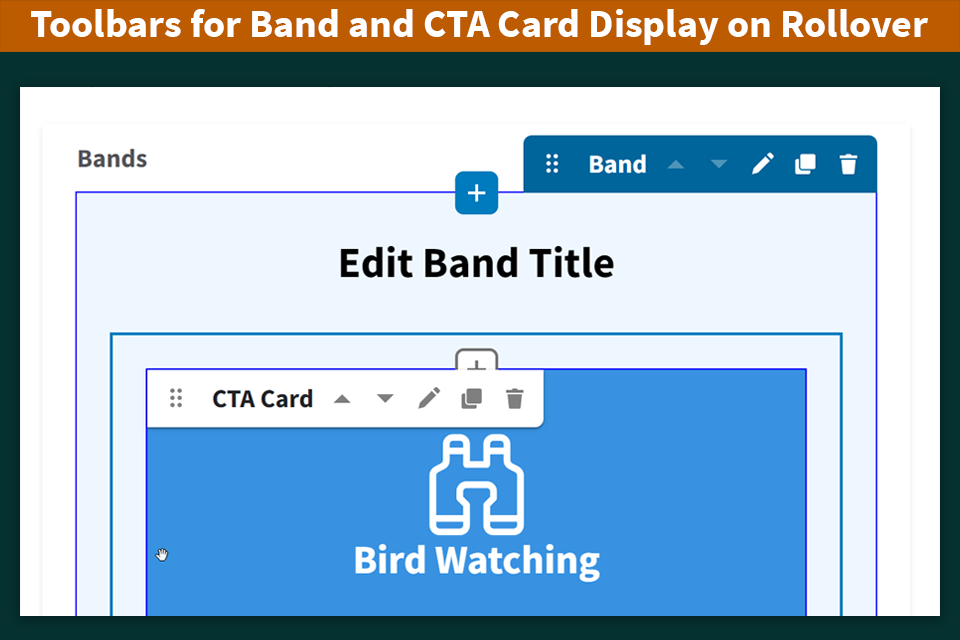
Toolbars are invisible until the mouse rolls over the item they control. The icons for Add New, Move, Edit, Duplicate, and Delete are the same for all toolbars, but the location and color of the toolbars differ based on the item they control:
- When the mouse rolls over a Band, a blue and white Band Toolbar appears above the selected Band and a blue line outlines the Band area.
- When the mouse rolls over a Content Component, such as a CTA Card or Video Card, a gray and white Component Toolbar appears above that item.
| Icon | Meaning |
|---|---|
Add New:
| |
Move up or down:
| |
Edit Settings:
| |
Duplicate:
| |
Delete:
| |

| Drag-and-Drop Cursors:

|
How to:
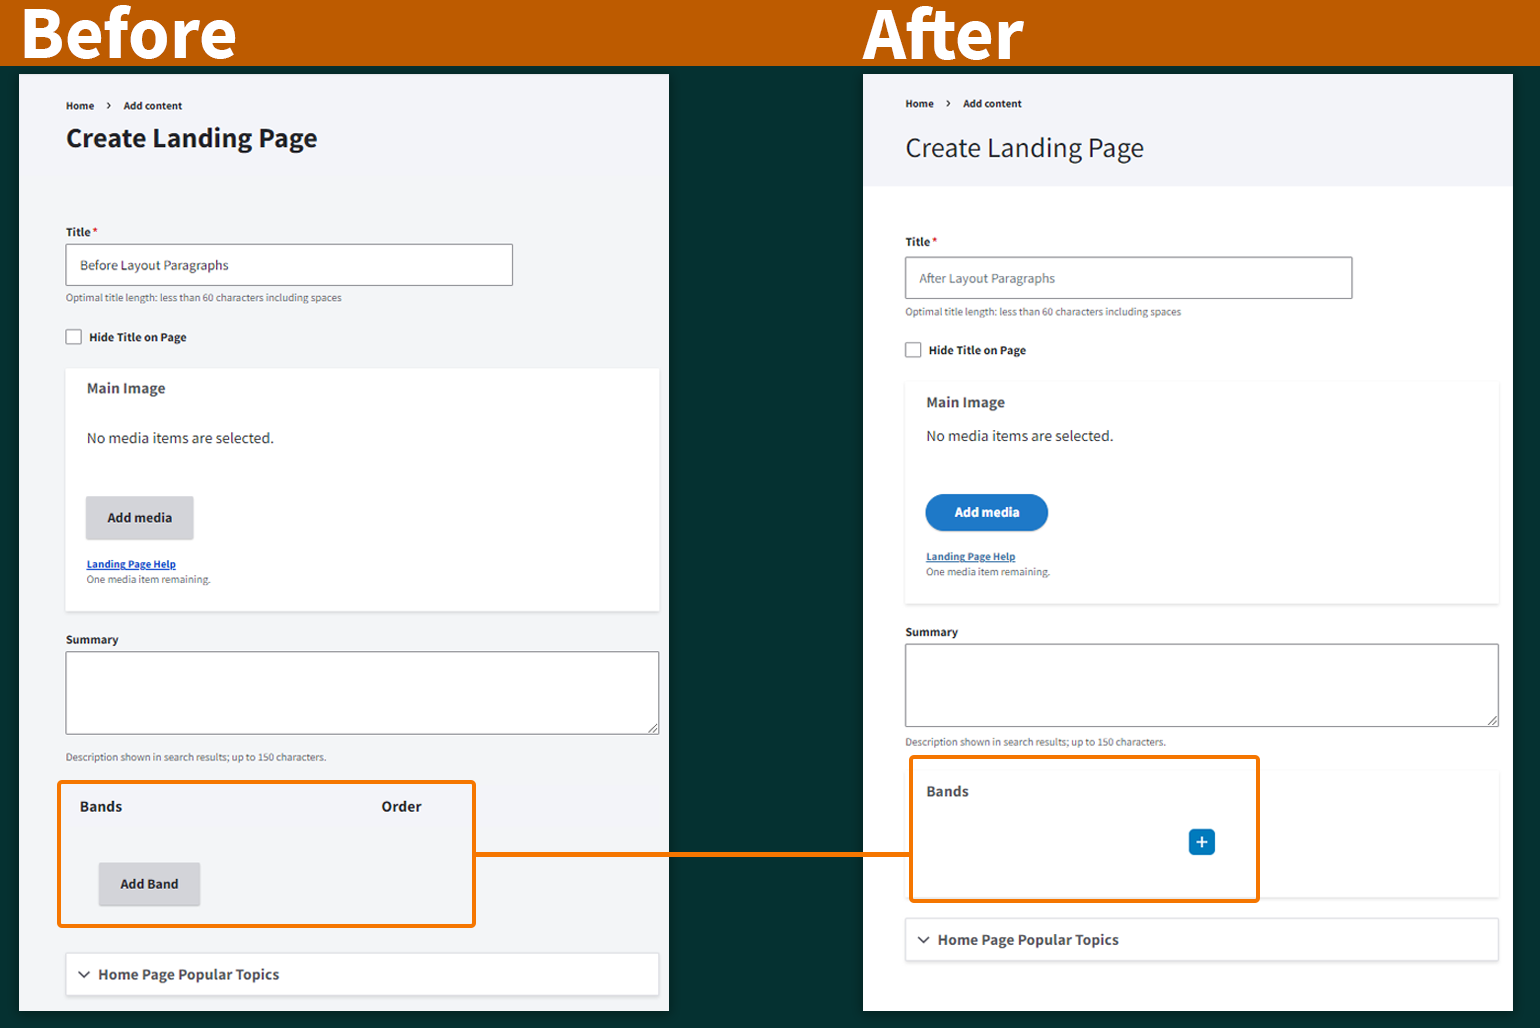
The gray button "Add Band" button is being replaced by the blue "Add New Band" button.
- Click the "Add New Band" button, represented by a blue square with a white plus sign, to add a new Band to a page. Open Image 1 Full Size
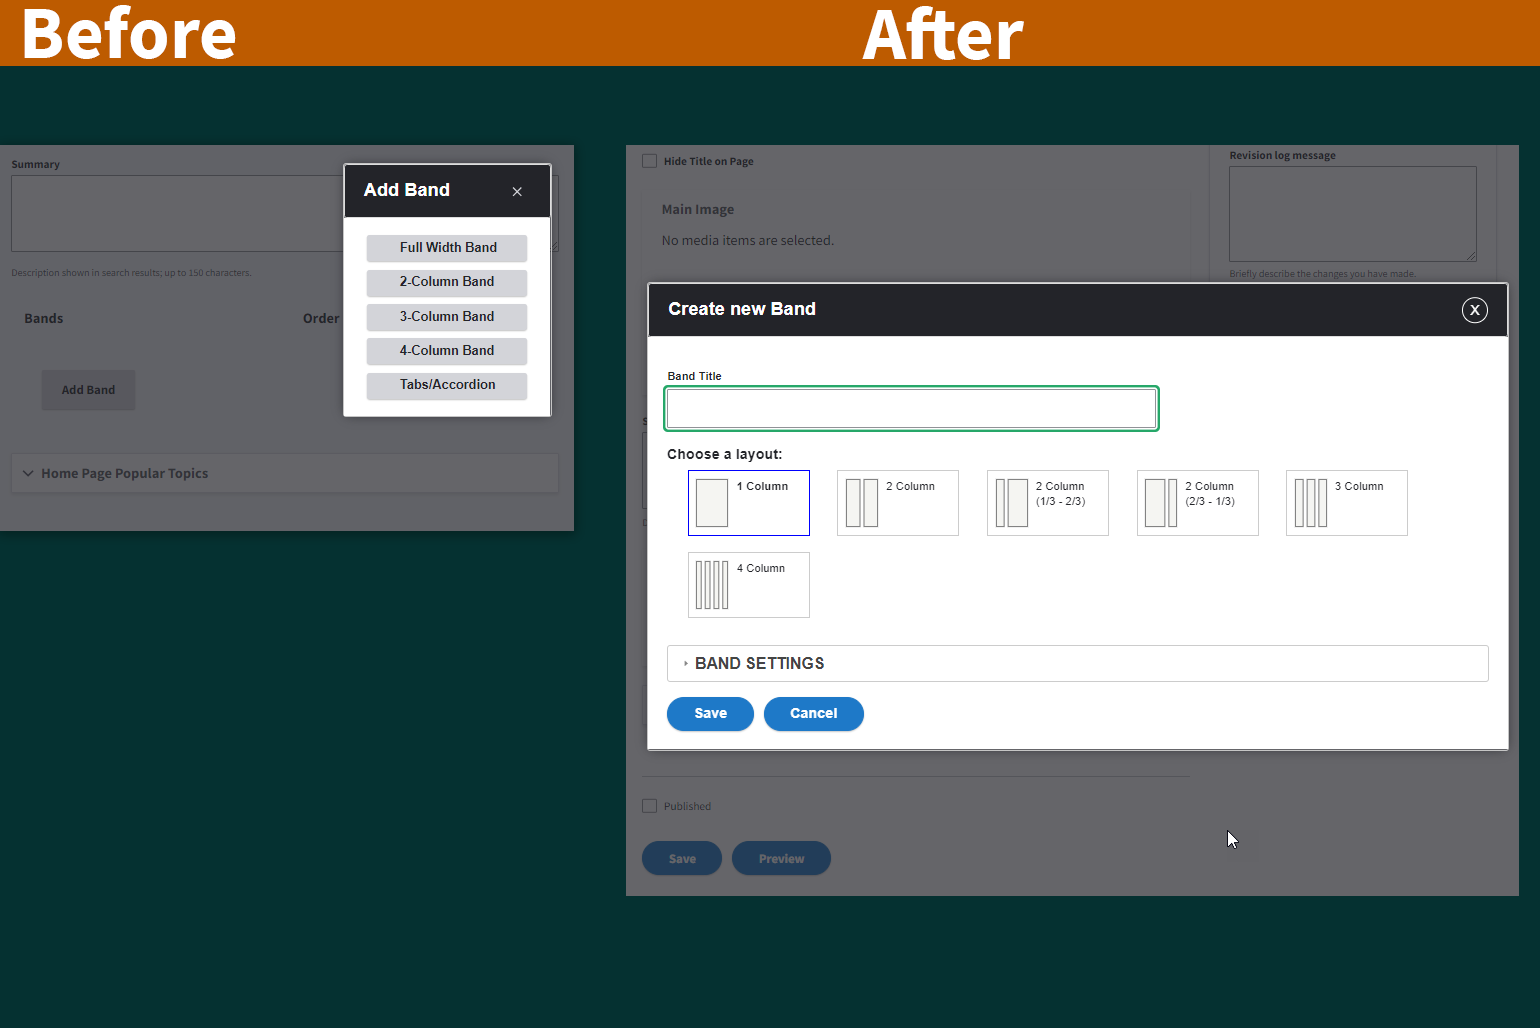
- Next, enter the Band Title, select the number of columns and layout, and edit Band Settings as desired. Then, click Save. Open Image 2 Full Size
Note: After adding this first Band, the blue "Add New Band" button will appear at the top and bottom of the Band, allowing you to insert more Bands above or below the existing one.
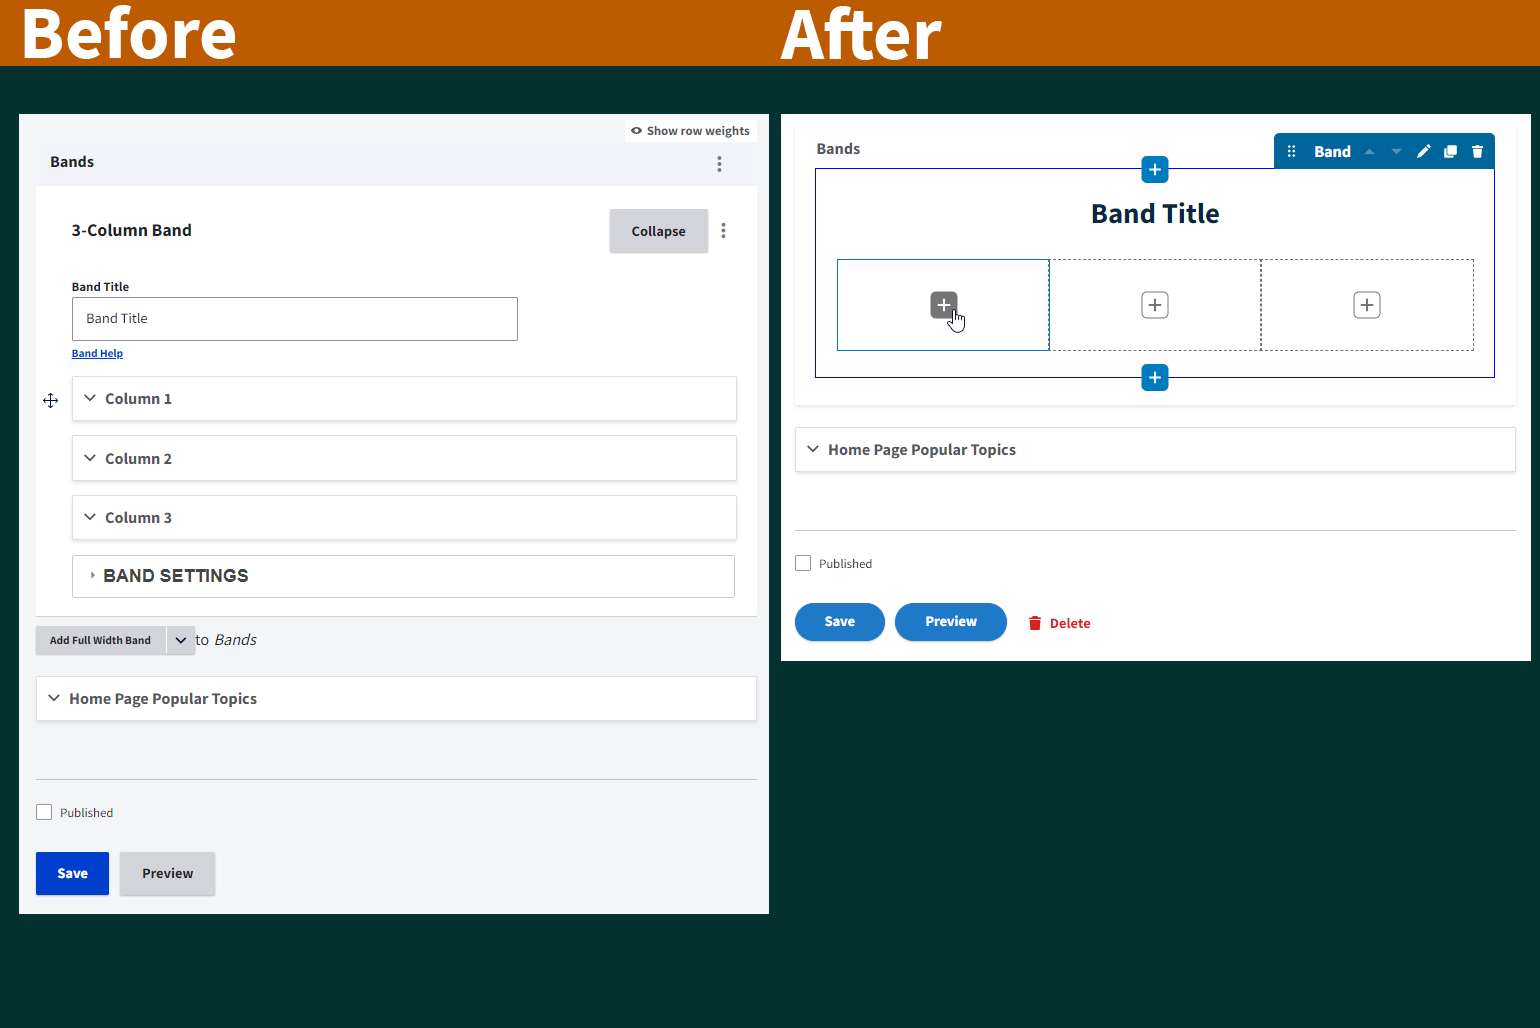
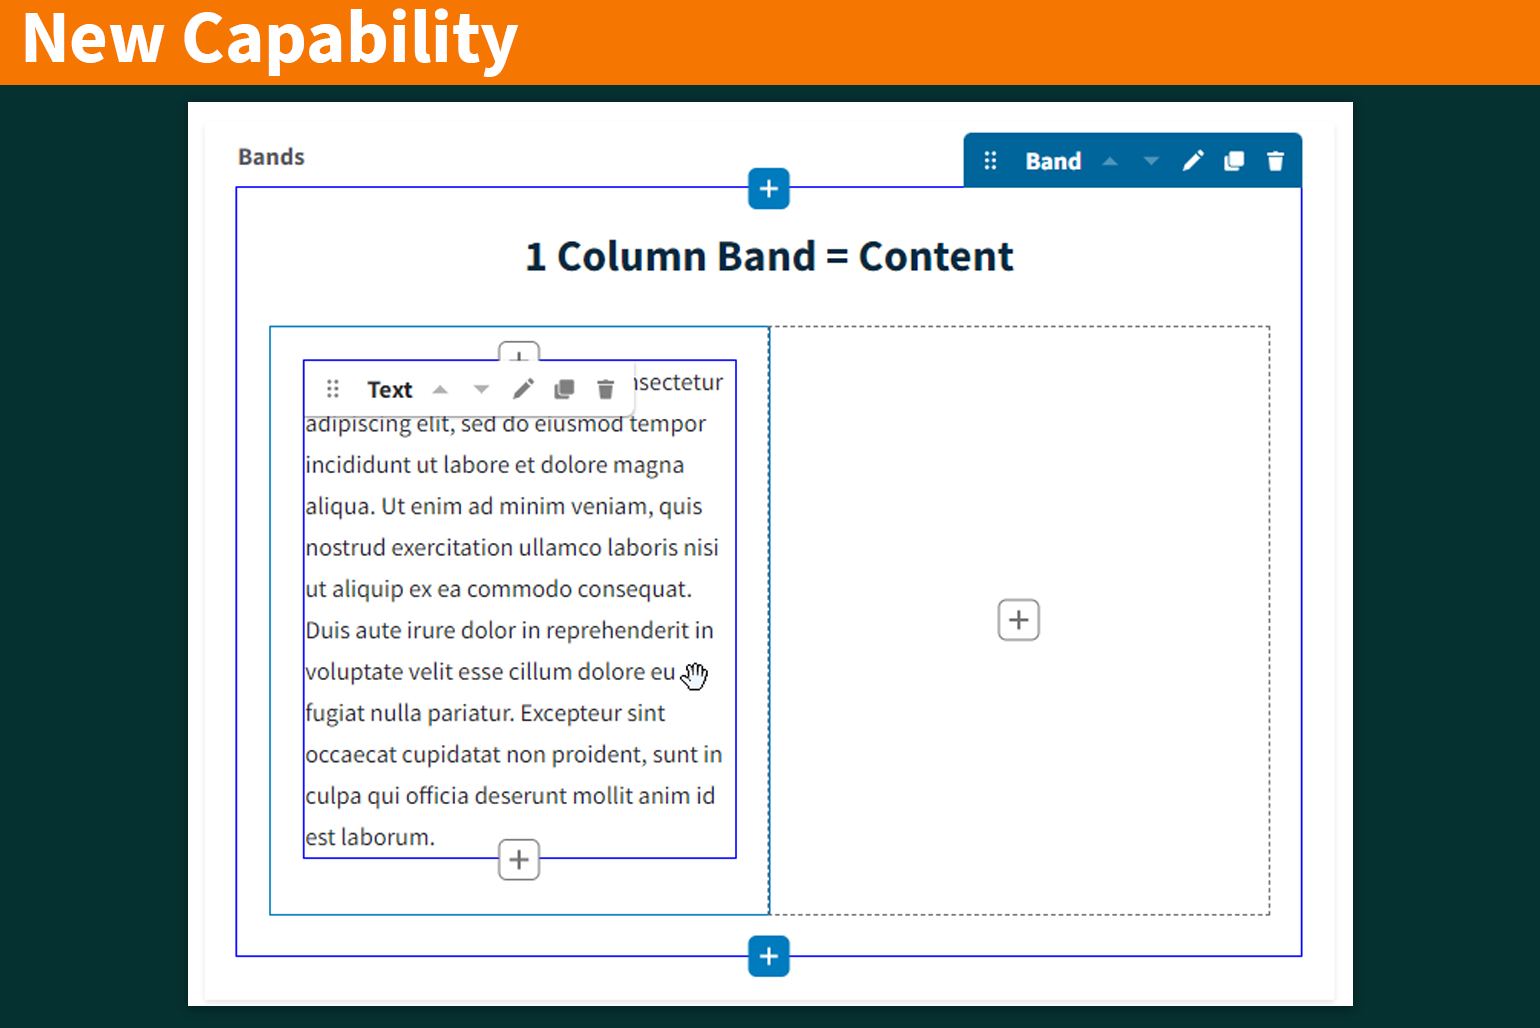
Users currently add content to columns by clicking a caret to expand an area of the page for that column. Going forward, the editing interface will more closely match the way content is rendered on the page, requiring fewer clicks. Columns are indicated by a gray dotted outline.
- Select the gray and white "Add New" icon for the desired column. Open Image 1 Full Size
- Select the paragraph type or content component desired. Open Image 2 Full Size
- Configure the component as usual, then click Save.
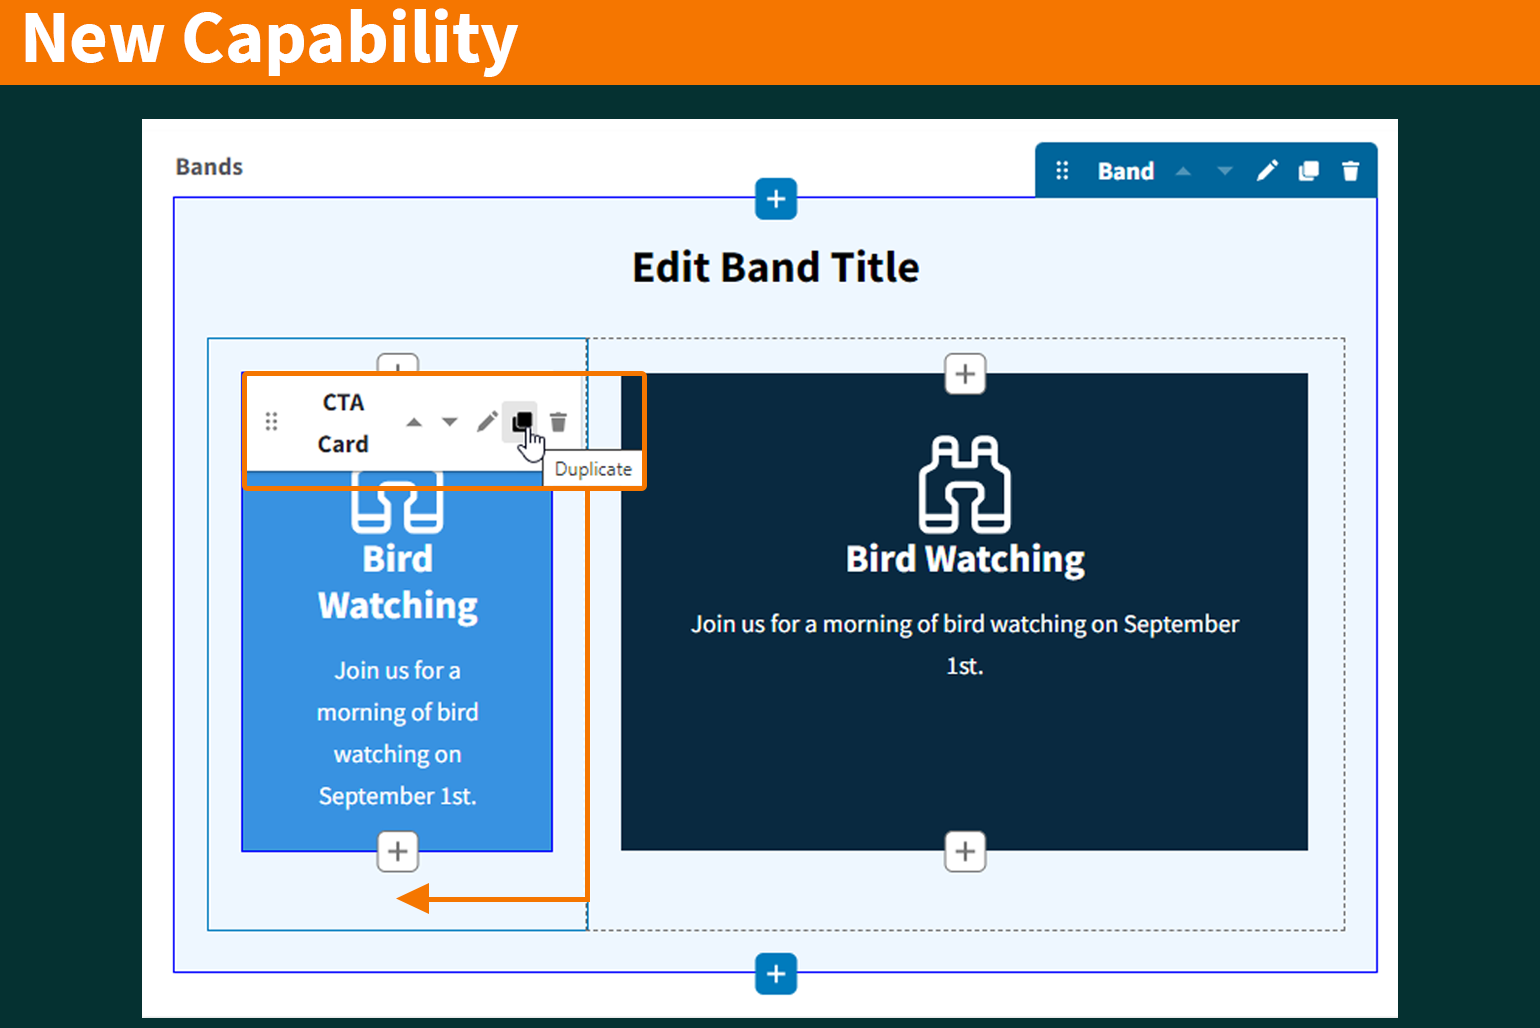
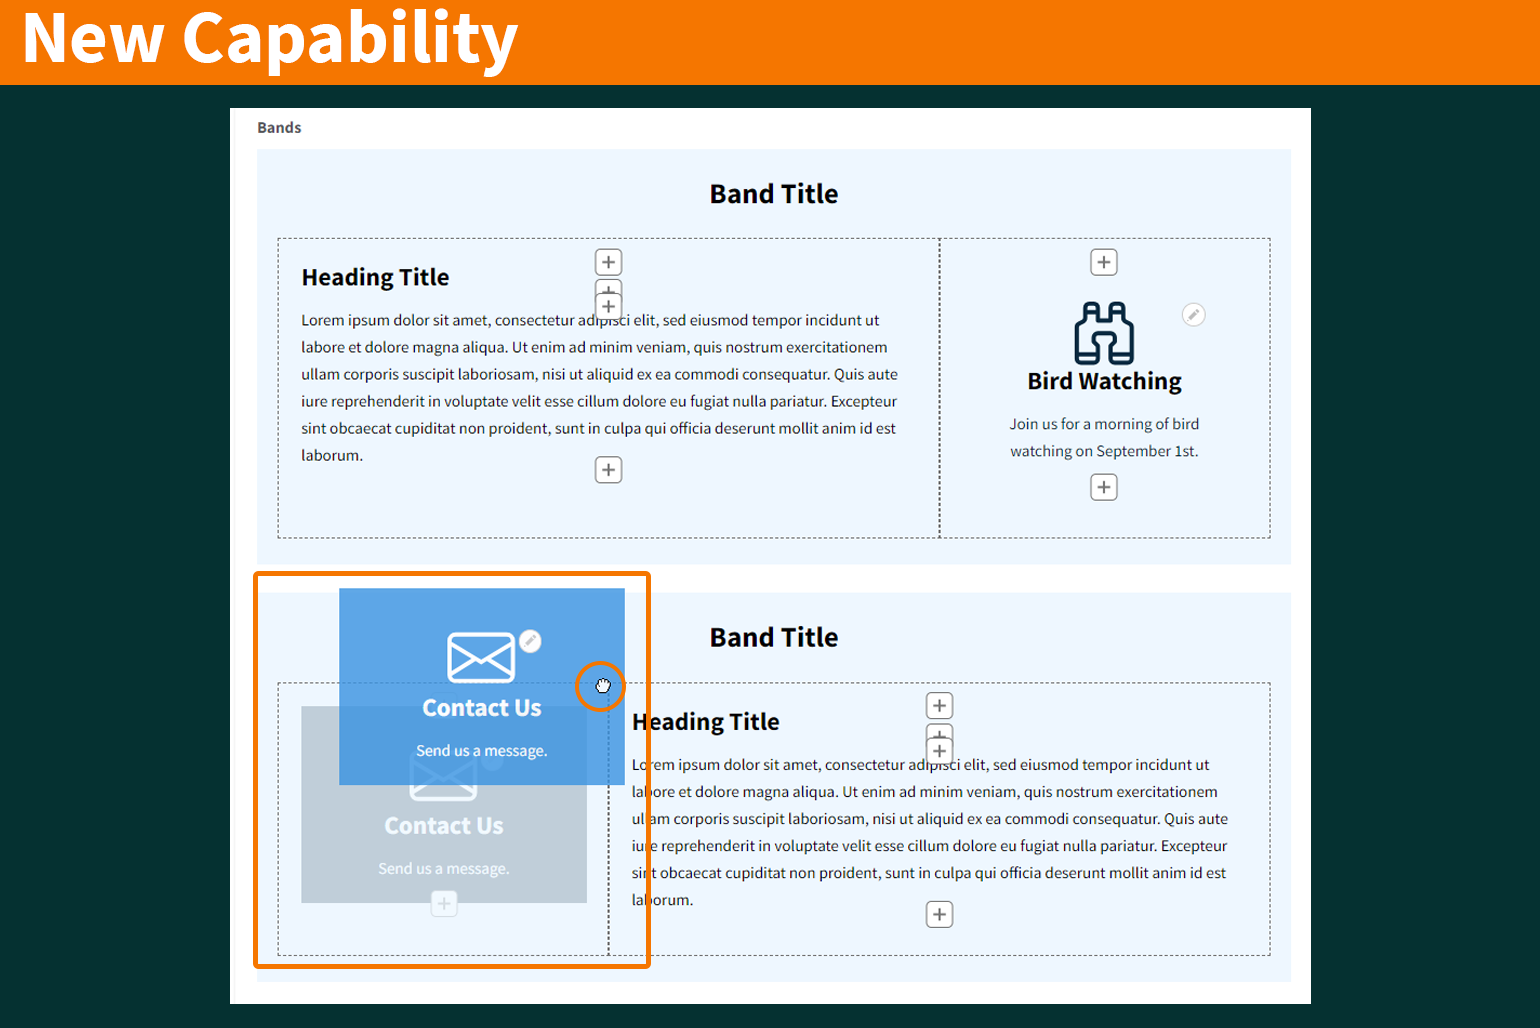
Landing Pages have a new capability: content duplication. After adding a content component to a Band, such as a CTA Card in this example, the content can be duplicated, edited, and reused elsewhere on the page.
- Click the Duplicate icon on the content toolbar. An exact copy appears directly below the original in the same column. Note: There is no vertical spacing or padding between multiple content items in the same column; items stack directly on top of each other. Best practice: Move the content using drag-and-drop to an empty column in either the same Band or a different Band. Dragging the content outside the band and releasing it automatically creates a new 1-Column content band. Open Image 1 Full Size
Currently, all new Bands are added to the bottom page, then reordered if desired. Content managers click the caret to choose from a drop-down menu the desired number of columns for the Band that is added to the bottom of the page.
Going forward, Bands will be indicated with a blue outline. New Bands can be added above or below existing bands by clicking one of the Add New Band icons on the blue outline:
- Click the Add New Band icon at the top of the outlined area to insert a new Band above the selected Band.
- Click the Add New Band icon at the bottom of the outlined area to insert a new Band below the selected Band.
Note: Toolbars are invisible until the mouse hovers over the Band or Content Component. Open Image 1 Full Size

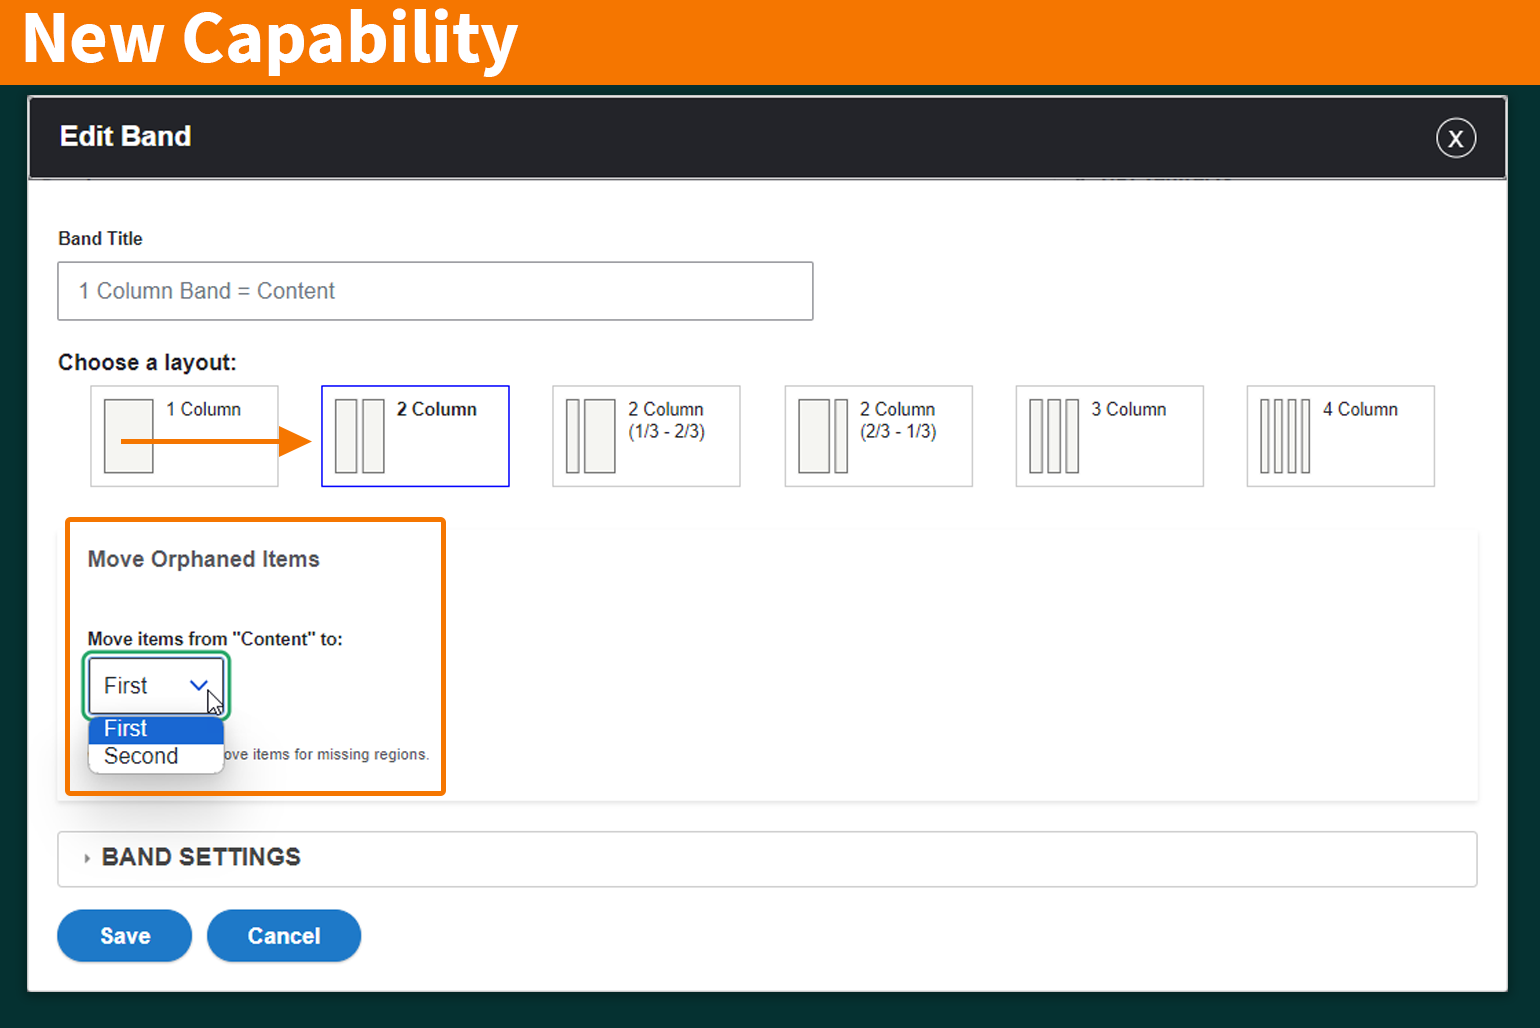
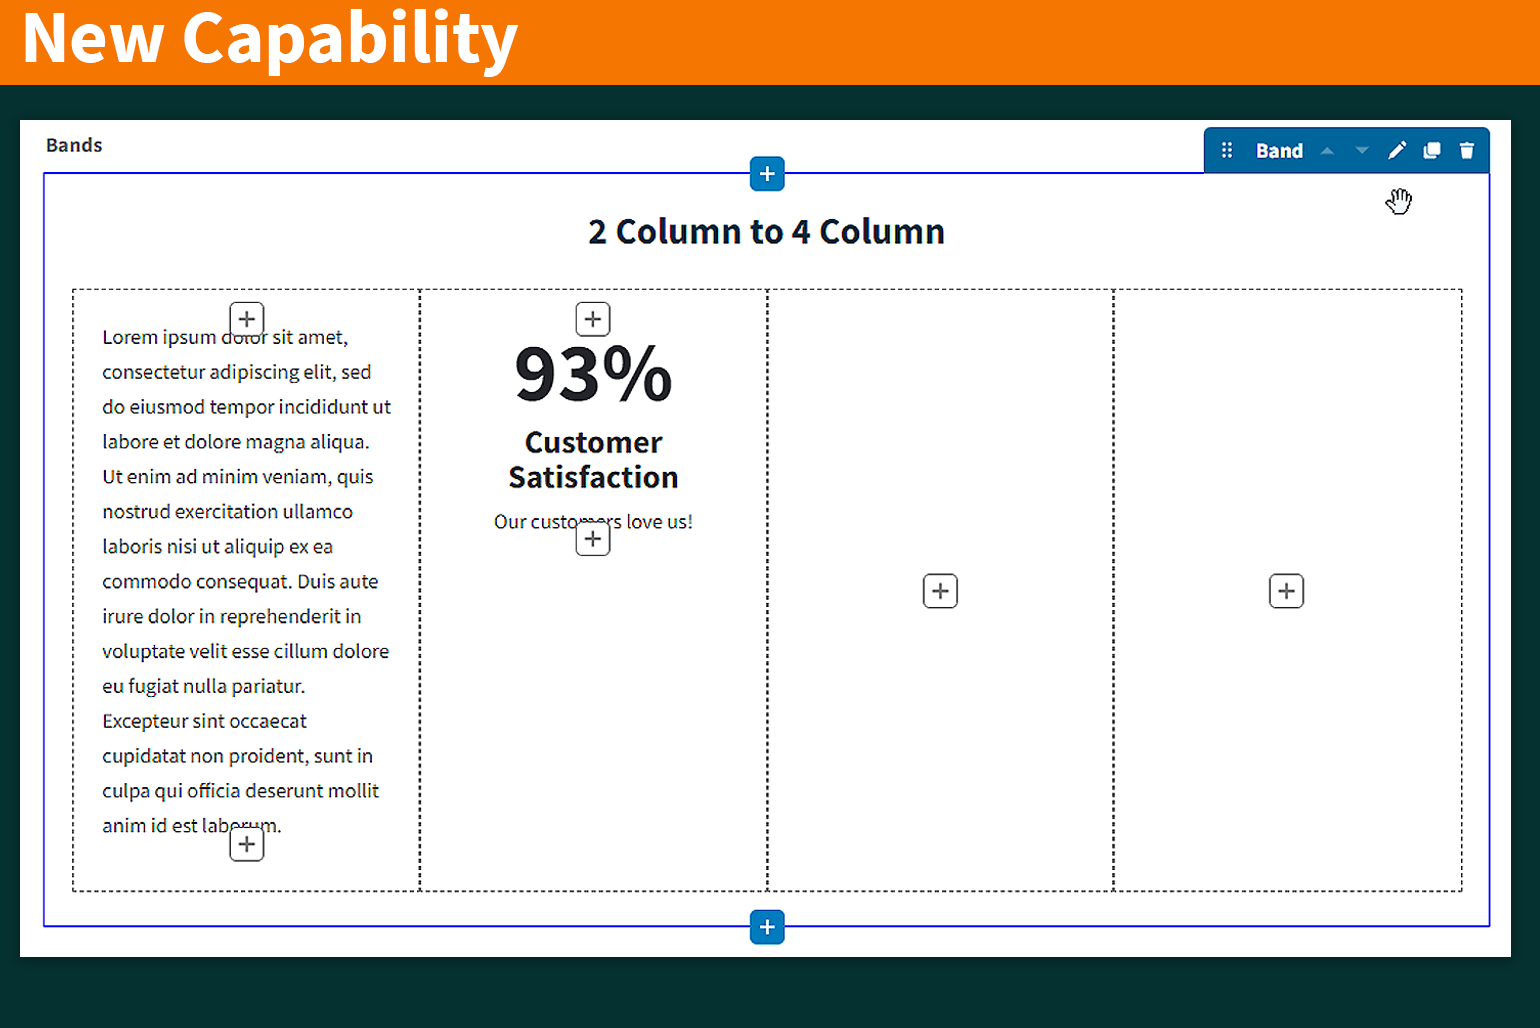
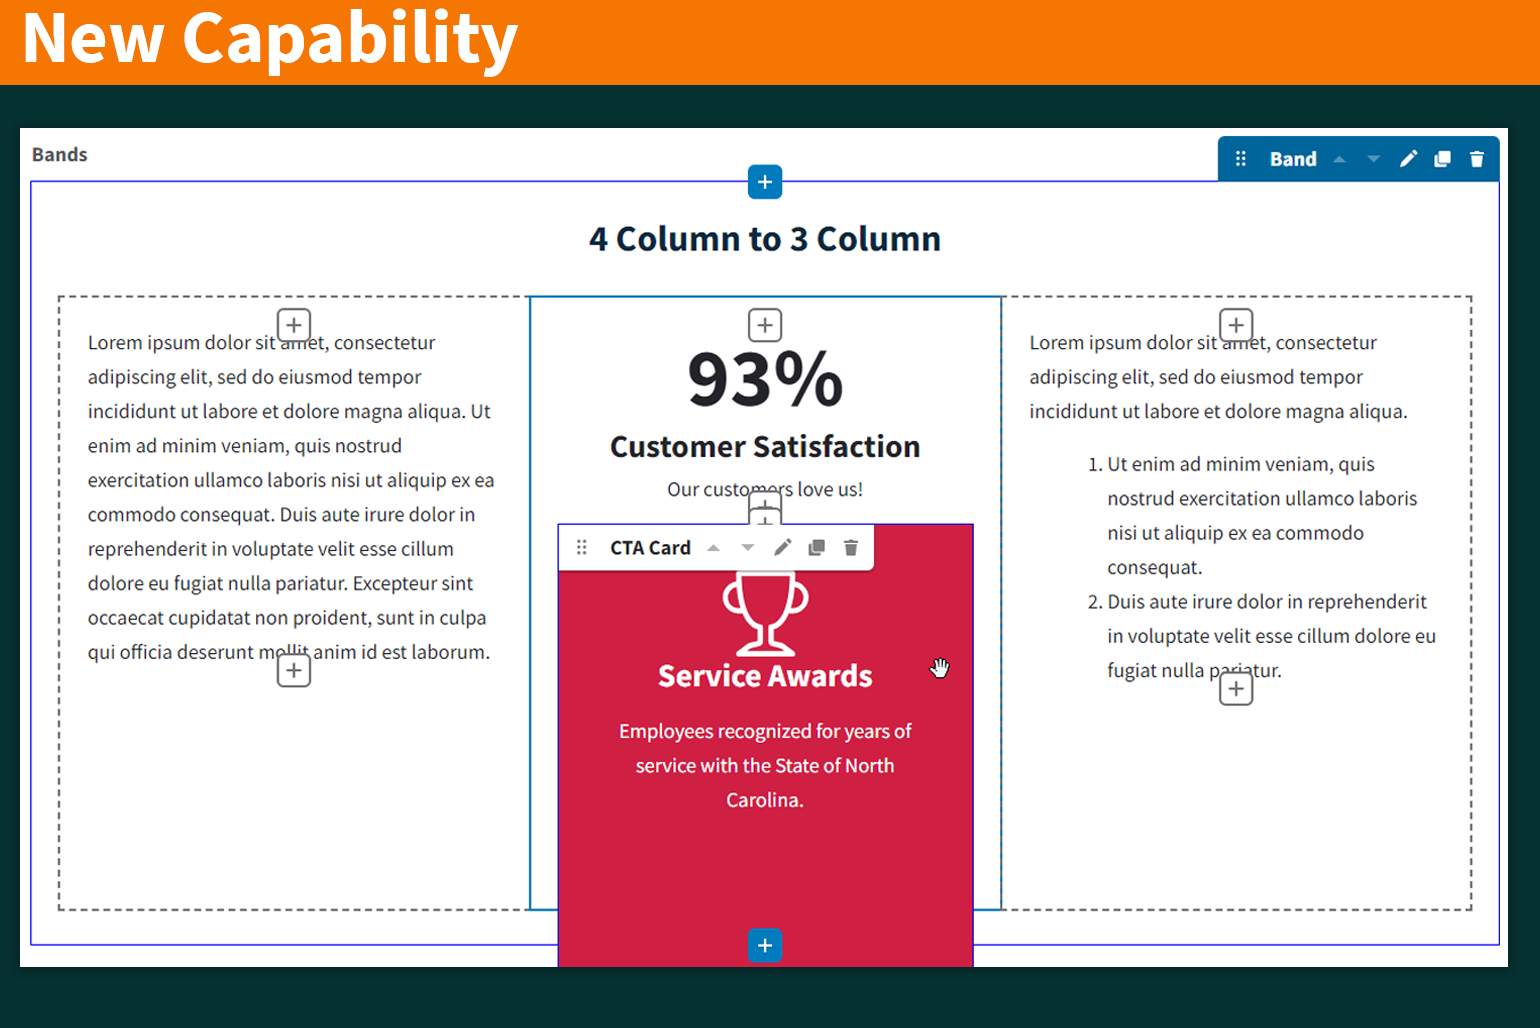
Landing Pages have a new capability: changing the selected column layout. Currently, content managers cannot change the number of columns in an existing Band; the Band must be deleted and a new Band created. After Landing Page enhancements are enabled, you will be able to easily increase the number of columns in a Band without losing existing content. The steps vary slightly depending on whether or not the existing Band contains content and its number of columns.
- Click the Edit icon for the Band. Open Image 1 Full Size
- In this example, a 1-Column Band is converted to a 2-Column Band. When adding columns to a 1-Column Band, rather than assuming that you want the existing content in the First column, the platform prompts you to select a new home for existing content. Open Image 2 Full Size
- Use the drop-down menu to select the First, Second, Third or Fourth column as the new location for existing content. In this example, existing content is sent to the First column and a new, empty second column has been added. Open Image 3 Full Size
- When a band already contains two or three columns with content, the content remains in place and new columns are added to the right. You are not prompted to select a new home for existing content as is the case for a 1-Column Band. Open Image 4 Full Size
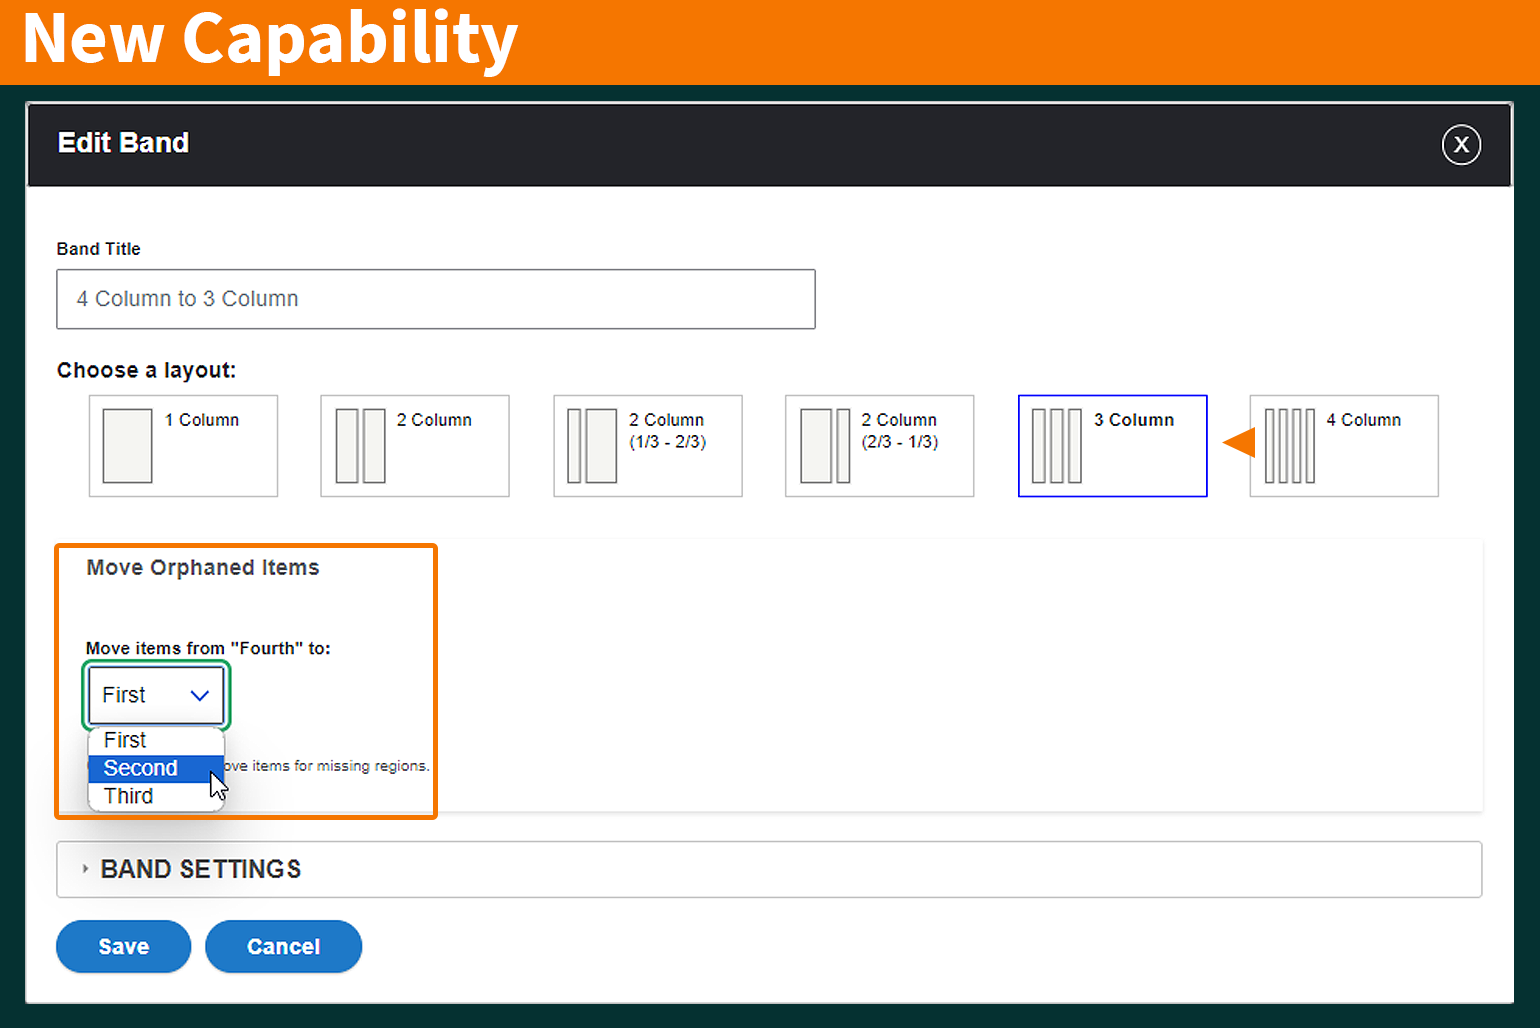
Landing Pages have a new capability: changing the selected column layout. Currently, content managers cannot change the number of columns in an existing Band; the Band must be deleted and a new Band created. After Landing Page enhancements are enabled, you will be able to easily decrease the number of columns in a Band without losing existing content.
- Hover over the Band to display the Band toolbar. Select the Edit icon indicated by the pencil. Open Image 1 Full Size
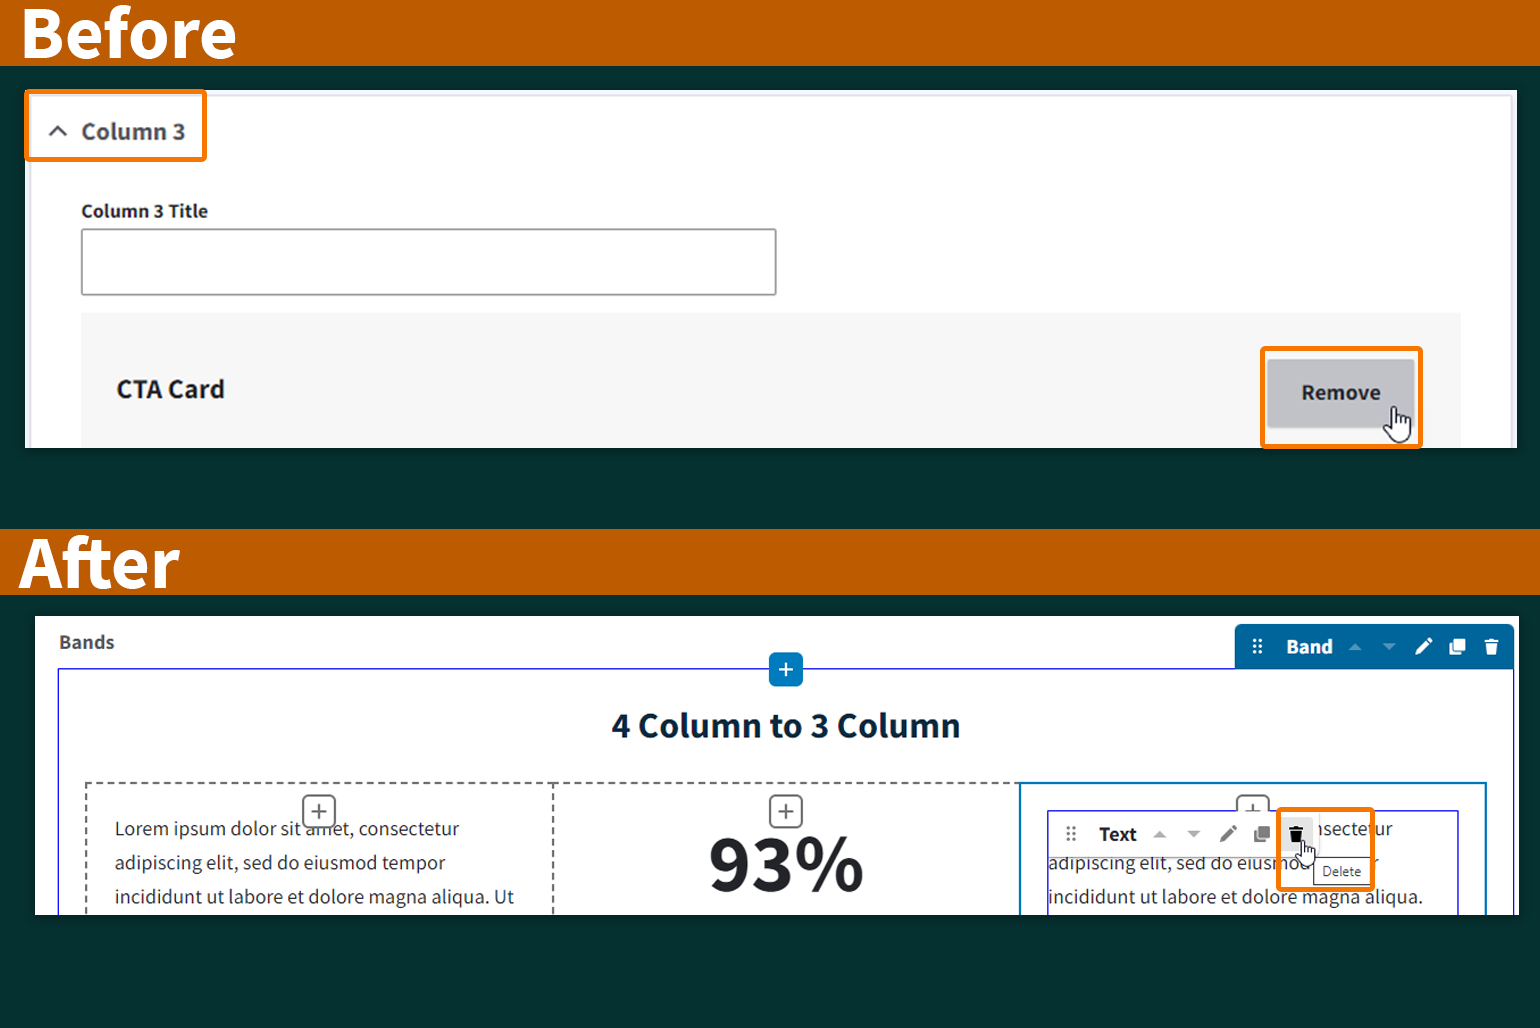
- When removing columns, the platform prompts you to select a new home for orphaned content. In this example, a 4-Column Band is being reduced to a 3-Column Band, which displaces the content contained in the fourth column. The CTA Card in the fourth column will be sent to the second column. Open Image 2 Full Size
- The content from the fourth column now appears directly below the existing content in the second column. Note: There is no vertical spacing or padding between multiple content items in the same column; items stack directly on top of each other. Best practice: Move the content using drag-and-drop to an empty column in either the same Band or a different Band. Dragging the content outside of a Band and releasing it automatically creates a new 1-Column content Band. Open Image 3 Full Size
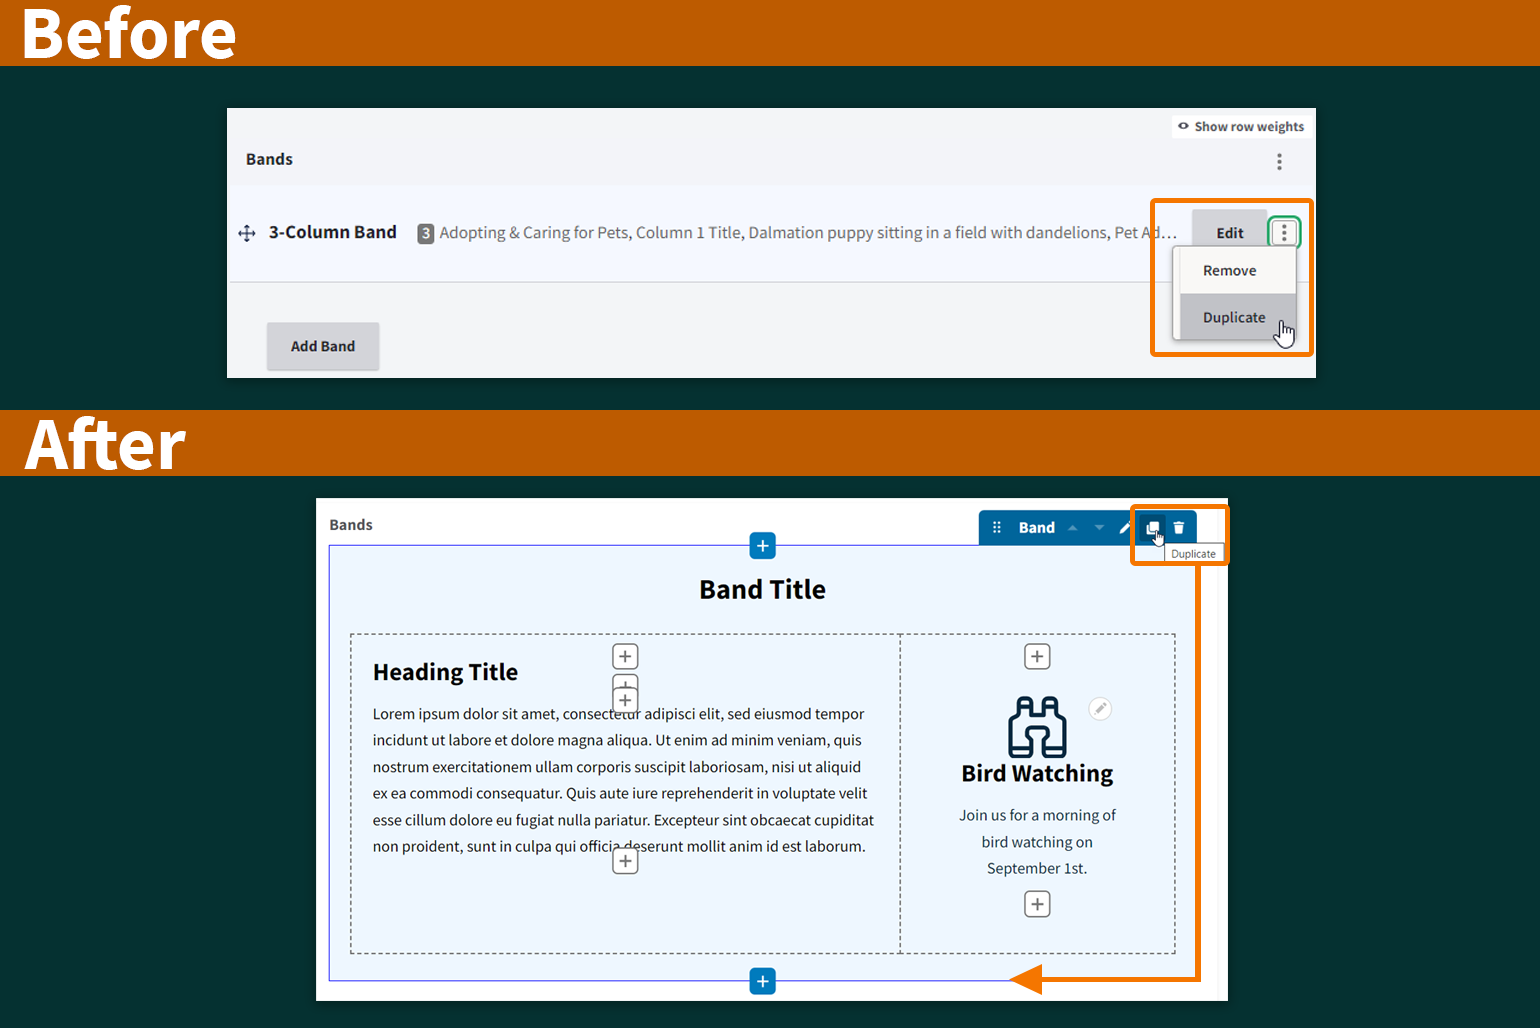
Content managers can currently duplicate a Band and the content contained within it on a Landing Page by clicking the ellipses and selecting "Duplicate" for the selected Band; an exact copy of the Band is added beneath the original. Following Landing Page enhancements, content managers will still be able duplicate Bands and achieve the same results, but the interface will offer a more visual "what-you-see-is-what-you-get" experience.
- Click the Duplicate icon on the Band toolbar. An exact copy appears directly below the original Band. Open Image 1 Full Size
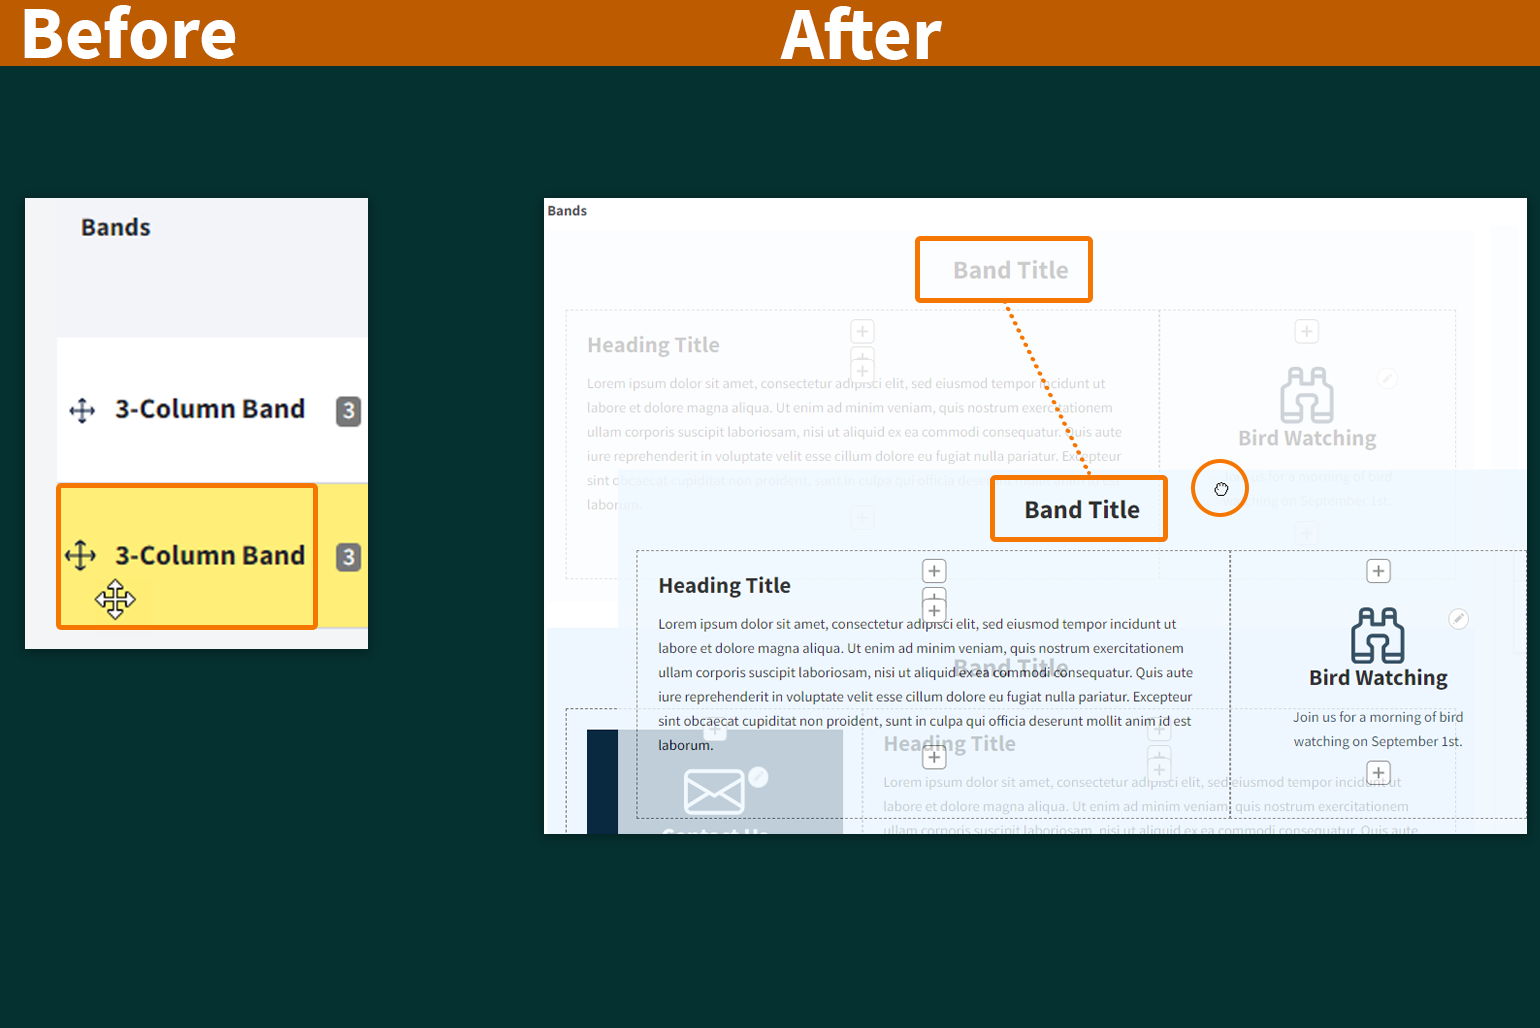
Content managers can currently rearrange Bands on a page by either drag-and-drop or row weights. After Landing Page enhancements, content managers will still have two ways of rearranging Bands, but a few details will differ.
- Drag and Drop: Content managers can grab anywhere on the outer edges of the Band and drag it to a new position on the page. The Band becomes partially transparent while dragging and is placed in the vertical location where the mouse releases. Additionally, the drag-and-drop cursor will change to a grabbing hand going forward instead of the crosshair with arrowheads. Open Image 1 Full Size
- Move up / Move Down Arrows: Instead of numerical row weights, Bands can be moved up or down with the arrow icons in the Band toolbar. Open Image 2 Full Size
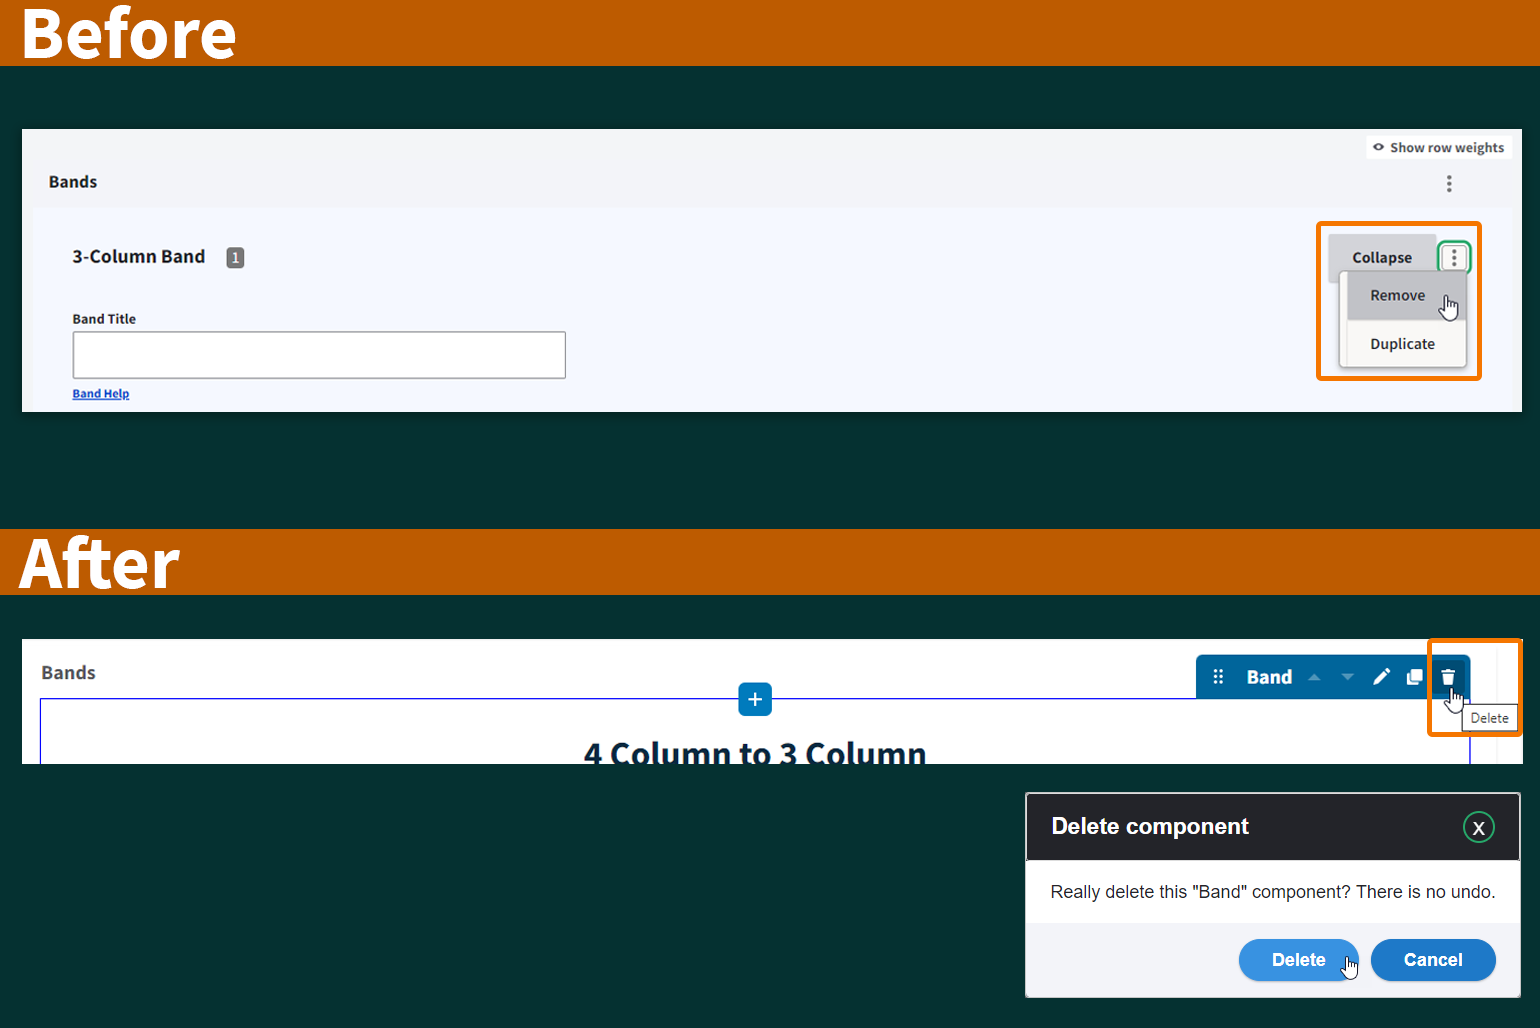
After Landing Page enhancements are enabled, you will be able to delete Content Components or Bands by clicking the Delete icon indicated by the trash can in the appropriate toolbar.
- To delete a Content Component, click the Delete icon in the gray and white Content Toolbar. Open Image 1 Full Size
- To delete a Band, click the Delete icon in the blue and white Band Toolbar. Open Image 2 Full Size
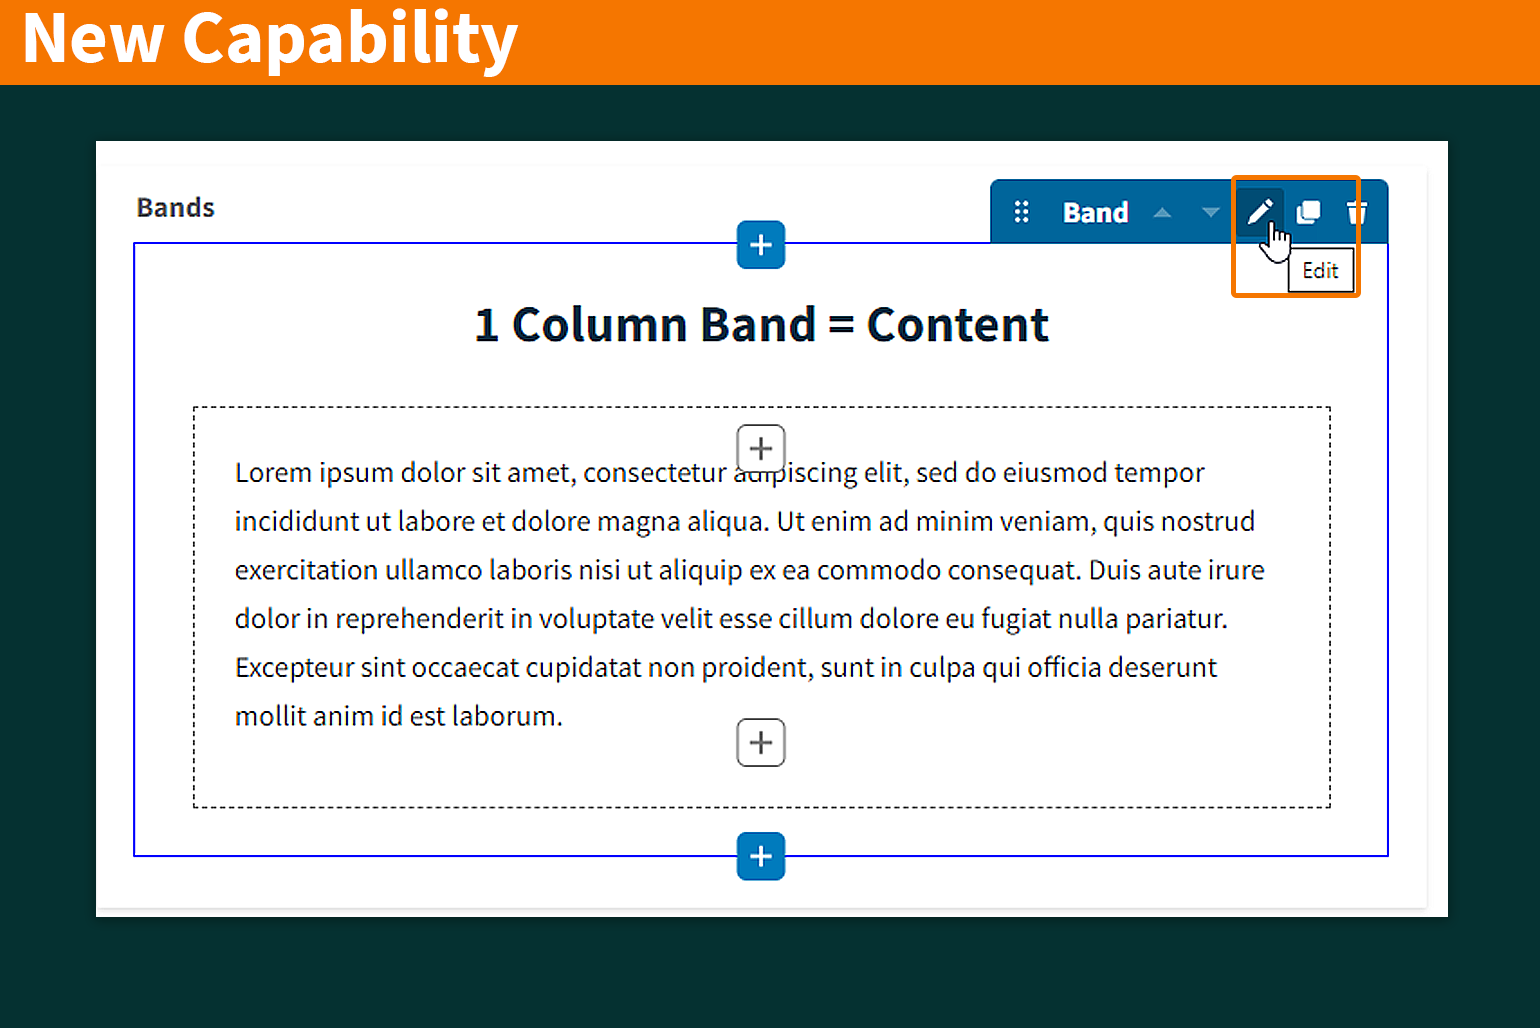
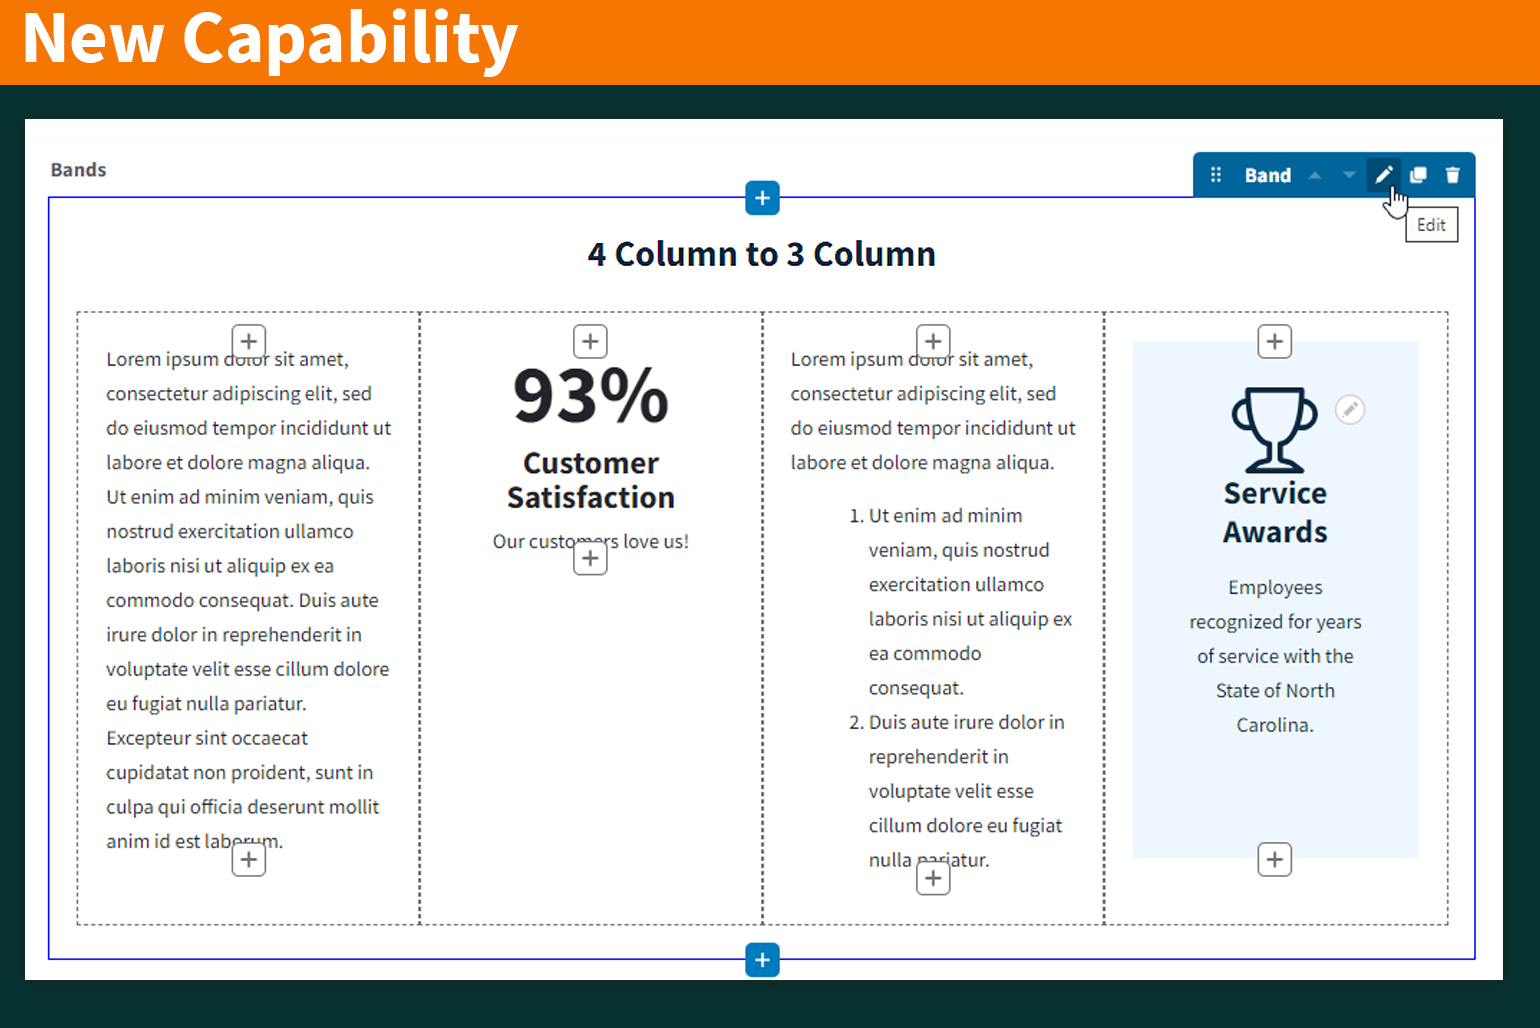
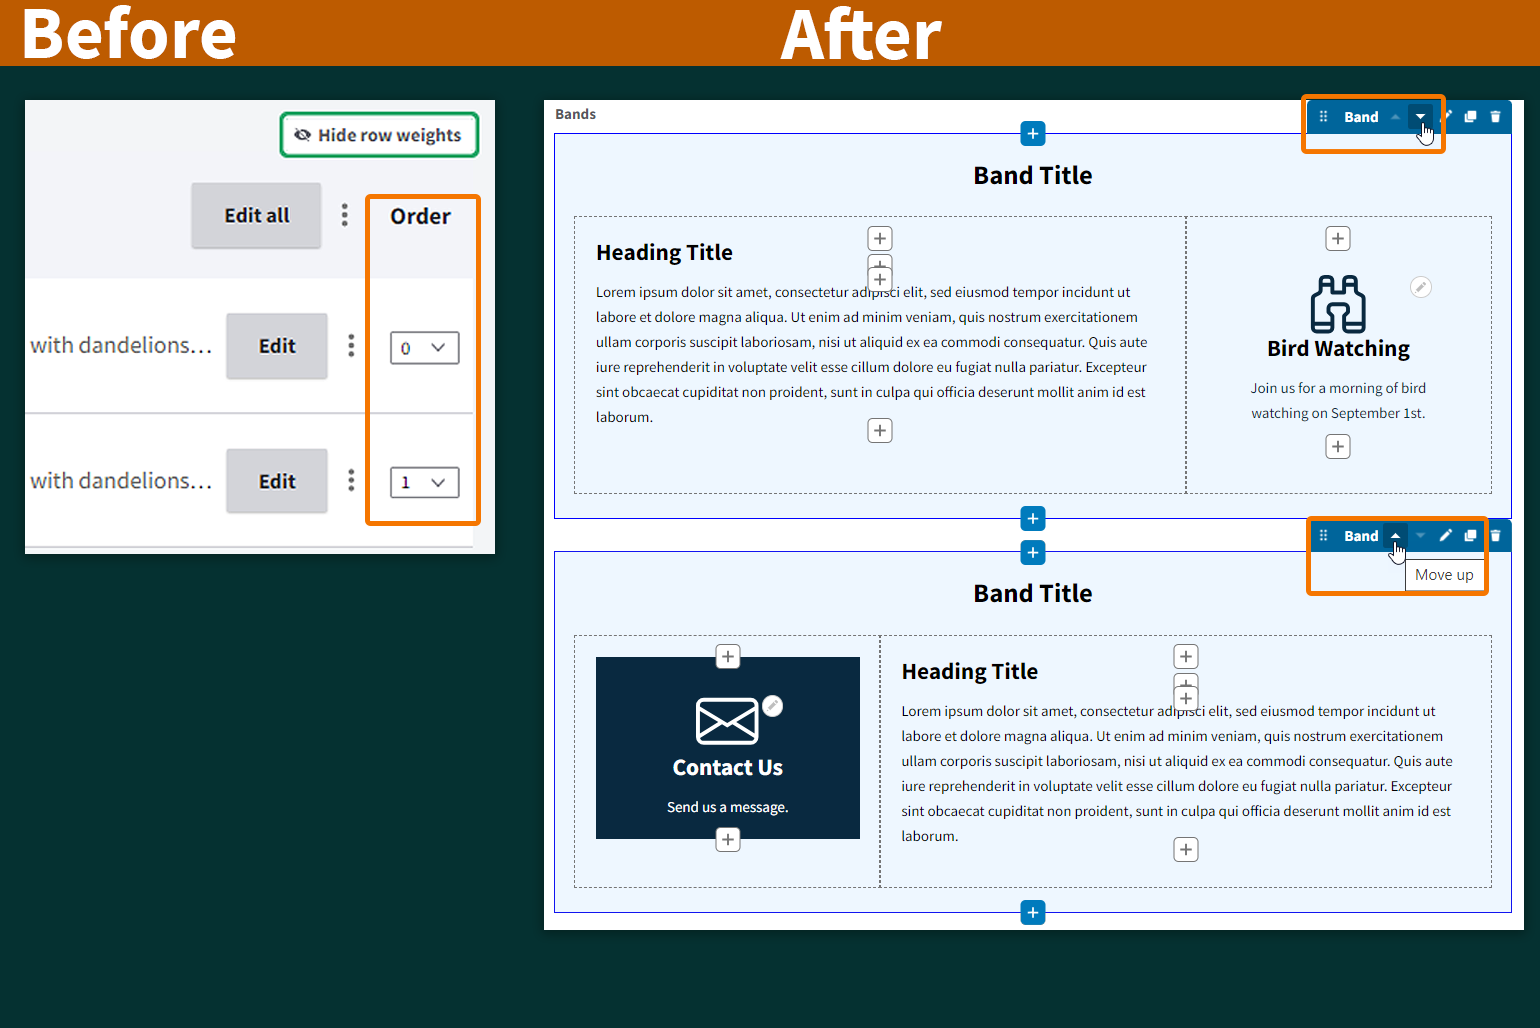
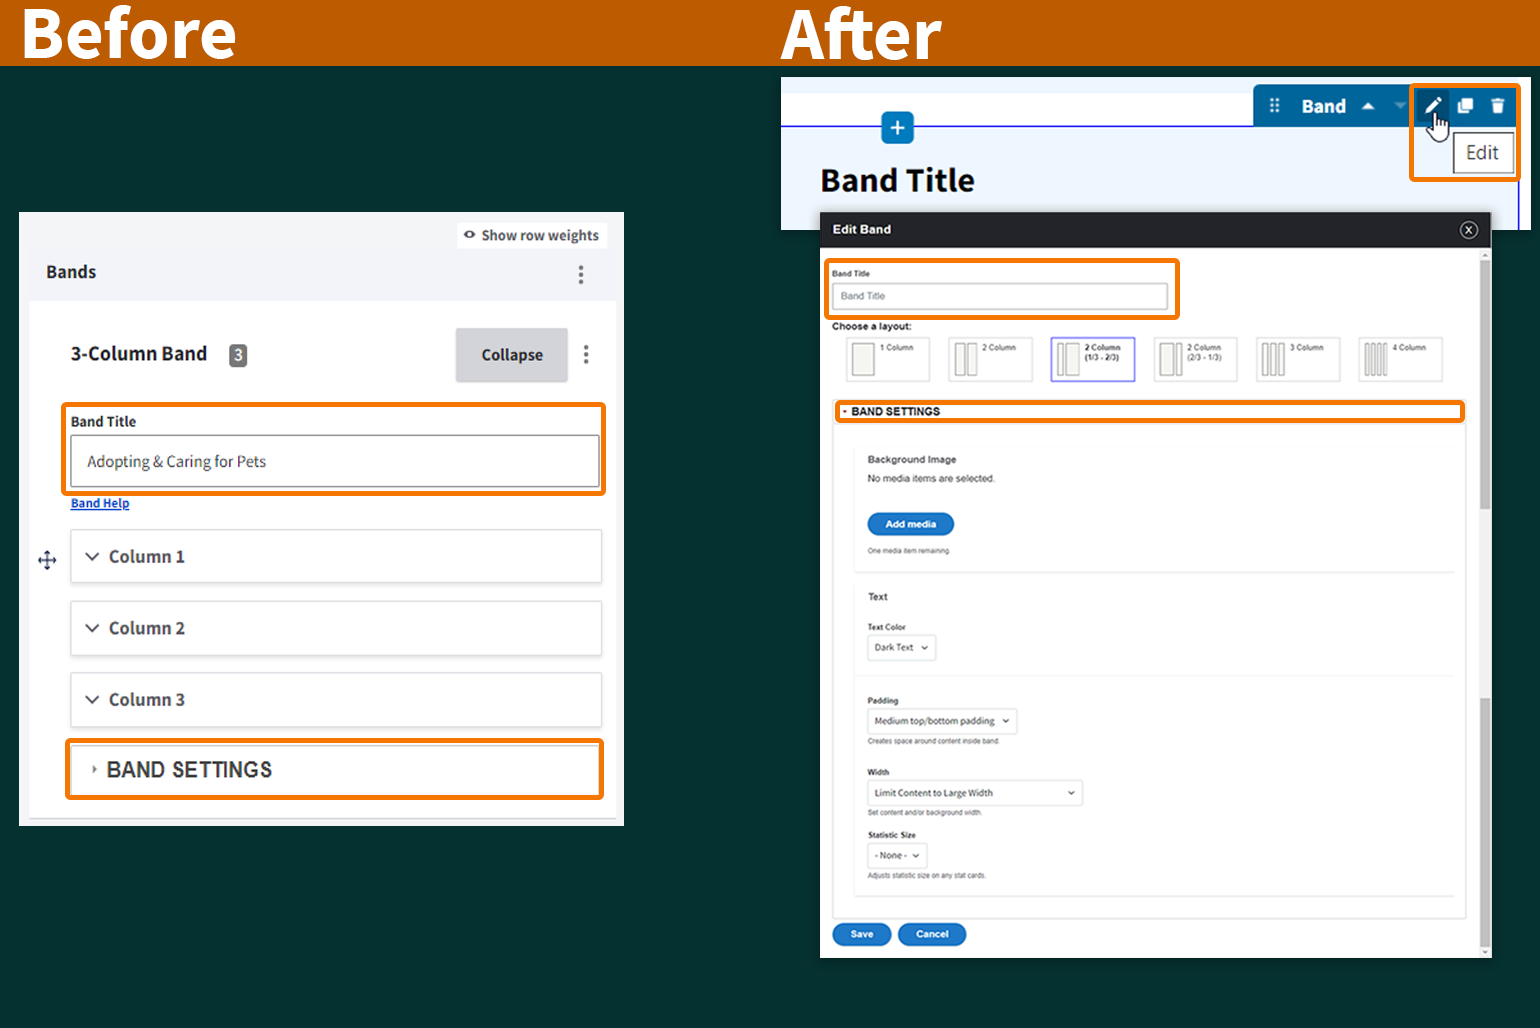
Currently, the Band Title and Band Settings are located above and below the column content editing area. After Landing Page enhancements, these settings will be accessed through the Edit function indicated by the pencil icon on the Band toolbar. A new capability also allows you to change the Column Layout after the initial layout has been defined.
- Click the pencil icon in the Band toolbar to Edit the Band Title, Column Layout, or Band Settings, then click Save. Open Image 1 Full Size
Landing Pages have a new capability: drag-and-drop content. After adding a Content Component to a Band, such as a CTA Card in this example, the content can be dragged and dropped into a different location on the page. The content becomes partially transparent while dragging and is placed in the location where the mouse releases. The drag-and-drop cursor is a grabbing hand.
Where can I drop content? Content can be dragged into:
- a different column in the same Band
- a column in a different Band.
- empty space on the page. Dragging the content outside of a Band and releasing it automatically creates a new 1-Column content Band.
Note: There is no vertical spacing or padding between multiple content items in the same column; items stack directly on top of each other. Best practice: Move the content using drag-and-drop to an empty column in either the same Band or a different Band.
- Grab anywhere on the Content Component, drag it to the desired location, and release the mouse button. Open Image 1 Full Size
Before Landing Page enhancements roll out, Content Managers can clone a Landing Page and retain all Bands, Titles, column layouts and content contained within the Bands. In the current release of the Landing Page enhancements, Bands, Titles, and column layouts are retained on clones, but content contained within the bands is lost. Developers are working on this issue but have decided that it should not prevent the rollout of the overall improvements.
Example: After rollout, an enhanced Landing Page has a 3-column band containing a CTA Card, a Video Card, and an Article Card. Cloning the page yields a copy that contains a 3-column band with the same title, however the CTA Card, Video Card, and Article Card will be missing.
Landing Page Enhancement Topics
Jump to a section on this page.