View Webform Submissions
-
1
Find the Webform
- Navigate to Structure > Webforms.
- Locate the desired webform. Filter by keyword if necessary. Example: Webforms are filtered to display only the results matching the keyword "April 10."
- Select the desired Webform to open it.

-
2
Results Tab
- After the desired Webform opens, select the Results tab.

-
3
Results > Submissions
- The Results > Submissions page opens by default and displays a customizable overview of a webform's submissions. Submissions can be reviewed, updated, flagged and/or annotated.
- The # column assigns a sequential number to webforms as they are submitted. If a result is later deleted, there will be a gap in the sequence. (in this example, 2 through 5 were deleted)
- The Submitted column shows the date and time the webform was submitted.
- User displays the name of the form submitter if they are logged into the website. If they are not logged in, it displays them as Anonymous. Most submitters will be Anonymous.
- IP Address shows the IP address of the person who submitted the form.
- Operations allow you to view, edit, or delete a specific result.
Note about deleting results
Typically, you should only delete results that are from practice forms, or were generated when you tested a new form. Keeping the results on the website allows all your authorized users to access them, and there are tools available to sort and analyze them. Additionally, deleting records has record retention implications; it's best to retain them on the website.

-
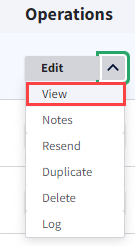
4
View a Specific Entry
In the Operations column, select View for a specific entry. You can use the Previous/Next submission links to move through the results without returning to the Results page.
-
5
Download Webform Submissions
- Select Results > Download to download results for the webform.
- There are a number of options you can specify, such as which fields to download, the format, or range. Choose the desired options and select the Download button to save the results to your computer as a .CSV file.

-
6
Grant Access to Submissions
Web Managers may grant access to specific users for a specific webform, if desired. Assigning access to submissions based on user roles is not recommended.
AccordionTab/Accordion ItemsFirst SidebarApril 8, 2024Grant User Access to a Specific Webform